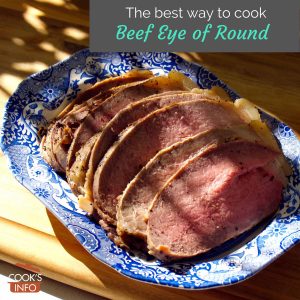
Roasted Eye of Round
This recipe turns an Eye of Round cut of beef into flavourful, moist, tender, pinkish slices of meat with a salt and pepper crust reminiscent of the sliced beef that delicatessens sell. The slices can be served as part of a hot meal, but they are also very good cold for lunch sandwiches, or in hot beef sandwiches. This roast is best carved with an electric knife or a meat slicer to get the nice, thin slices that are the final step in the tenderization. The thinner the better. However, if you have a surer hand than we do, you may be able to do it with a regular chef's knife or serrated bread knife. It's a three stage cooking process, that starts with (1) salting the meat for an extended period of time, (2) searing the meat, (3) then a stage of partial low, slow cooking and (4) finally a finishing stage in a hot oven turned off. It takes a long time but almost all that time is "idle time" for you, and it uses even less cooking fuel than a slow cooker would. Most people who have tried this method rate it highly. You need a meat thermometer for this technique. An Instant Read Meat Thermometer is best.
Cooking Temperature 110 C / 225 F / Gas Mark ¼
Ingredients
Instructions
Phase 1: Salt the meat, let stand overnight
- If the roast you are working with weighs over 4 ½ pounds (2 kg), cut it in half crosswise before beginning.
- Salt all sides of the meat evenly (ideally a coarse salt, such as kosher salt or a nice crunchy coarse sea salt.) Wrap the meat in plastic clingfilm (or pop into a plastic bag and seal), and refrigerate on a plate 18 to 24 hours.
Phase 2: Sear the meat
- Remove meat from refrigerator, and let sit for 30 to 40 minutes at room temperature to lose some of its chill.
- Remove and discard the plastic wrap. Pat the surfaces lightly with some paper towel to dry off any excess moisture, then rub the surfaces with some oil or spray lightly with cooking spray, and then rub lightly with some ground black or white pepper or a mixture of both.
- Start heating the oven to 110 C / 225 F / Gas Mark ¼
- Sear / brown all sides of the roast in a frying pan (no need for oil in the pan), then put the roast fat side up on a wire rack, either in a baking pan or on a cookie sheet with sides (to catch drippage, though there won't be much.)
Phase 3: Roasting Times for Roasted Eye of Round
- When the oven is heated, pop the prepared roast in the oven and cook as per Table 1 below.
- When the desired doneness as per Table 2 below and as indicated by internal temperature on your meat thermometer has been reached, you move to Phase 3.
Phase 4: Finishing Times for Roasted Eye of Round
- Turn the oven off, and leave roast just as it is in the oven to finish off on the remaining heat in the oven.
- During this period, try to have the open door opened as little as possible so the remaining heat doesn't escape. When checking the temperature of the roast, remove it from oven, put on top of stove, close oven door, then check and put back into oven if needed. If you feel your oven has gone quite cold and that the roast doesn't have a chance of reaching your desired temperature, put roast back in oven, turn oven back on, bring it back up to 110 C / 225 F then immediately turn the oven off, and let the roast stand in there for an additional 15 to 30ish minutes until you get your desired internal temperature.
- Remove from oven. If you plan on serving it then, while still warm, cover and let rest for 10 to 15 minutes. If you are planning to use it as sandwich meat, then leave uncovered and let cool completely then slice.
- Slice very thinly.
Notes
A beef Eye of Round is a very tough cut of meat, so it is usually cooked as a pot roast. It will end up tender when cooked as a pot roast, but will usually be so dry and stringy that everyone is pouring buckets of gravy on it.
This technique avoids that. It was documented in "Cooks Illustrated" magazine, January 2008.
Note that after you've made it once, you may need to adjust cooking / resting times to allow for how well (or not so well) insulated your oven is.
Note that as for "fat side up", there won't be much of a fat side, usually just one side with a very thin transparent layer of fat.
Tried this recipe?Let us know how it was!
Table 1 cooking times
| Desired doneness | Internal temperature to be reached | For weight of: 2 to 2 ½ lb (.9 to 1.1 kg) | For weight of: 3 ½ to 4 ½ lb (1.5 to 2 kg) |
|---|---|---|---|
| Rare / Medium-rare | 115 F / 45 C | about 1 ¼ hours | about 1 ¾ hours |
| Medium | 125 F / 50 C | about 1 ¾ hours | about 2 ¼ hours |
Table 2 cooking times
| Desired doneness | Internal temperature to be reached | Time required |
|---|---|---|
| Rare | 50 C (125 F) | about 20 to 25 minutes |
| Medium-rare | 55 C (135 F) | about 30 minutes |
| Medium | 60 C (140 F) | about 50 minutes |

